Config Options
| Environment | CLI Flag | Default | Description |
|---|---|---|---|
| PHOTOPRISM_OIDC_URI | –oidc-uri | issuer URI for single sign-on via OpenID Connect, e.g. https://accounts.google.com | |
| PHOTOPRISM_OIDC_CLIENT | –oidc-client | client ID for single sign-on via OpenID Connect | |
| PHOTOPRISM_OIDC_SECRET | –oidc-secret | client SECRET for single sign-on via OpenID Connect | |
| PHOTOPRISM_OIDC_SCOPES | –oidc-scopes | openid email profile address | client authorization SCOPES for single sign-on via OpenID Connect |
| PHOTOPRISM_OIDC_PROVIDER | –oidc-provider | custom identity provider NAME, e.g. Google | |
| PHOTOPRISM_OIDC_ICON | –oidc-icon | custom identity provider icon URI | |
| PHOTOPRISM_OIDC_REDIRECT | –oidc-redirect | false | automatically redirects unauthenticated users to the configured identity provider |
| PHOTOPRISM_OIDC_REGISTER | –oidc-register | false | allows new users to create an account when they sign in with OpenID Connect |
| PHOTOPRISM_OIDC_USERNAME | –oidc-username | preferred_username | preferred username CLAIM for new OpenID Connect users (preferred_username, name, nickname, email) |
| PHOTOPRISM_OIDC_DOMAIN | –oidc-domain | verified email domain NAME for single sign-on via OpenID Connect pro | |
| PHOTOPRISM_OIDC_ROLE | –oidc-role | guest | default user ROLE for new OpenID Connect users pro |
| PHOTOPRISM_OIDC_GROUP_CLAIM | –oidc-group-claim | group claim NAME to read from OIDC tokens (default groups) | |
| PHOTOPRISM_OIDC_GROUP | –oidc-group | require membership in at least one group ID (repeat flag to add multiple) | |
| PHOTOPRISM_OIDC_GROUP_ROLE | –oidc-group-role | map GROUP=ROLE; repeat to add more (roles: admin, manager, user, viewer, contributor, guest) | |
| PHOTOPRISM_OIDC_WEBDAV | –oidc-webdav | false | allows new OpenID Connect users to use WebDAV when they have a role that allows it |
| PHOTOPRISM_DISABLE_OIDC | –disable-oidc | false | disables single sign-on via OpenID Connect, even if an identity provider has been configured |
Your PhotoPrism instance and the OpenID Connect Identity Provider (IdP) must be accessible via HTTPS and have valid TLS certificates configured for it. Please also make sure that the hostname in the Redirect URL configured on the IdP matches the Site URL used by PhotoPrism. Single sign-on via OIDC can otherwise not be enabled.
Identity Providers
To allow users to log in via OIDC, you can either set up and use a self-hosted identity provider such as ZITADEL or Keycloak, or choose a public authentication service such as those provided by Google, Microsoft, GitHub, or Amazon.
Single sign-on can then be configured automatically through your identity provider’s /.well-known/openid-configuration service discovery endpoint, for example:
Issuer URI
The Issuer URI in your configuration must match the issuer value returned by the /.well-known/openid-configuration endpoint of your OpenID Connect Identity Provider (IdP), for example https://accounts.google.com if you use Google for authentication.
You may not modify the URI in any way, e.g. by adding or omitting slashes at the end. If the values do not match, the validation will fail and users cannot be redirected to your provider’s login page. For security reasons, only a generic error message is displayed in this case.
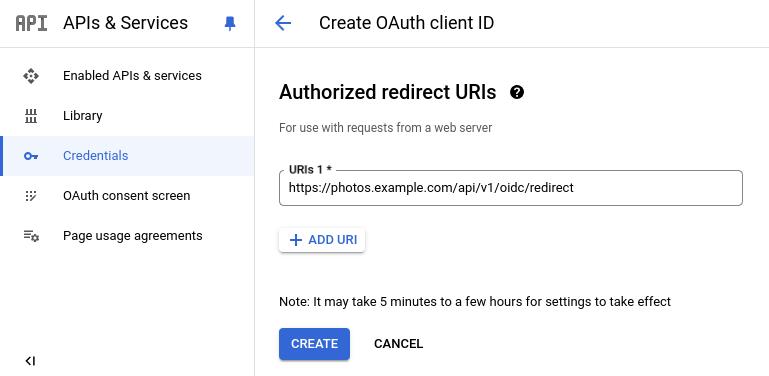
Redirect URL
The Redirect URL that must be specified when registering a new client with an Identity Provider is as follows, where {hostname} must be replaced by the hostname in the Site URL, e.g. configured via PHOTOPRISM_SITE_URL:
https://{hostname}/api/v1/oidc/redirect
Note that both the Site URL configured for your instance and the Redirect URL must start with https:// and that their hostnames must match, as the use of secure connections is a strict requirement for OpenID Connect.
Preferred Username
When a new user signs in with OpenID Connect1, their preferred username may already be registered. In this case, a random 6-digit number is appended to resolve the conflict.
The config option PHOTOPRISM_OIDC_USERNAME allows you to change the preferred username claim for new accounts from preferred_username to name, nickname or verified2 email. The other claims are used as fallback if no value is returned for the configured claim. Names are changed to lowercase so that, for example, “John Doe” becomes “john.doe”.
Existing Accounts
Super admins can manually connect existing user accounts3 under Settings > Users by changing the authentication to OIDC and then setting the Subject ID to match the account identifier from the configured Identity Provider:
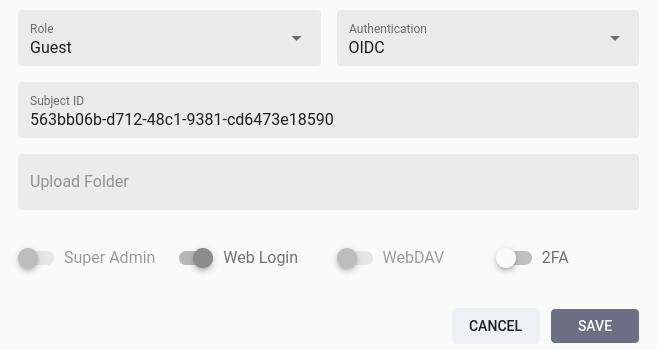
The Edit Account dialog may additionally contain a text field for the Issuer URL. It does not need to be entered manually as it is set automatically after the first login.
Alternatively, you can run the following command in a terminal to allow authentication via OIDC and set a Subject ID to connect existing accounts:
photoprism users mod --auth=oidc --auth-id=[sub] [username]
Passwords
Changing the authentication of an account to OIDC does not remove a previously set password, so that it can still be used to log in (optionally also in combination with 2FA).
If a local password has been set for an account, you can remove it by running the following command in a terminal:
photoprism passwd --rm [username]
Super admins can alternatively set the account password to a long random value through the Admin Web UI or CLI to effectively prevent local authentication.
Deleting Accounts
Deleted accounts remain linked to the Subject ID, so logging in via OIDC is no longer possible and no new account can be registered for the same Subject ID either.
If you wish to change the connected user account or create a new account instead, you must therefore change the authentication of the old account e.g. to None before deleting it:
photoprism users mod --auth=none [username]
To restore a previously deleted account, admins can follow the same steps as for creating a new account with the same username through the Admin Web UI or the photoprism users add command. You will then be asked if you want to restore the account.
Using Security Groups from Microsoft Entra ID
The following features are supported by our current implementation:
- Reads security groups from the
groupsclaim in ID or access tokens; accepts GUIDs or names (case-insensitive, sanitized viaNormalizeGroupID). - Optional required membership:
--oidc-group(orPHOTOPRISM_OIDC_GROUP) lists one or more groups that must be present; login is rejected if none match. If the token signals overage via_claim_names.groupsand contains no groups, login is denied with an audit entry explaining that membership could not be validated. - Group-to-role mapping:
--oidc-group-role(GROUP=ROLE, repeatable) assigns the first matching role; falls back to--oidc-role(defaultguest) when no mapping matches. - Keeps app/directory roles (
roles,wids) separate from security groups to avoid accidental privilege escalation. - Claim name is configurable via
--oidc-group-claim(defaultgroups).
You can use the following config options to map security groups and roles in PhotoPrism® Pro:
--oidc-group-claim/PHOTOPRISM_OIDC_GROUP_CLAIM: claim to read (defaultgroups).--oidc-group/PHOTOPRISM_OIDC_GROUP: comma- or multi-flag list of groups required for login (IDs or names accepted, normalized to lowercase alphanumerics/hyphen/underscore).--oidc-group-role/PHOTOPRISM_OIDC_GROUP_ROLE: mappingGROUP=ROLE(roles:admin|manager|user|contributor|viewer|guest|none). First match wins.--oidc-role/PHOTOPRISM_OIDC_ROLE: fallback role if no group mapping matches (defaults toguest).
Support for Entra ID Security Groups is only available with our team plans, not the personal editions.
Integration Guide for Entra ID Groups
- Register an app in Microsoft Entra ID (v2) or reuse your existing PhotoPrism registration. Note the tenant ID and the application (client) ID.
- Redirect URI: add
https://{hostname}/api/v1/oidc/redirect. - Token configuration → Add optional claim → Token type = ID (and Access if you prefer) → Groups → choose Security groups.
- Under “Emit groups as”, pick Group name (cloud-only) or sAMAccountName / DNSDomainName\sAMAccountName for synced AD; this makes tokens carry human-friendly names instead of GUIDs.
- If you keep Group ID, leave PhotoPrism config in GUID mode; if you emit names, set
PHOTOPRISM_OIDC_GROUP/PHOTOPRISM_OIDC_GROUP_ROLEto those names (lowercase in config for consistency). When Microsoft signals group overage (too many groups to fit in the token), it sets_claim_names.groupsand may omit groups entirely; PhotoPrism will currently block login if required groups are configured and no groups are present. - Grant admin consent for the chosen scopes (at minimum
openid profile email, plusoffline_accessif you need refresh tokens). - Configure PhotoPrism (example
.env-oidcwith placeholder secrets):PHOTOPRISM_OIDC_URI="https://login.microsoftonline.com/f8b10857-a7f2-49ba-b73c-6f619715f574/v2.0" PHOTOPRISM_OIDC_CLIENT="11111111-2222-3333-4444-555555555555" PHOTOPRISM_OIDC_SECRET="asecure-random-oidc-client-secret" PHOTOPRISM_OIDC_GROUP_CLAIM="groups" PHOTOPRISM_OIDC_GROUP="photoprism-admins, photoprism-users" # names or GUIDs PHOTOPRISM_OIDC_GROUP_ROLE="photoprism-admins=admin, photoprism-users=user" - Restart PhotoPrism; on login the service will:
- Read groups from ID token, then fall back to userinfo if absent.
- Deny login if required groups are configured but none are present (and overage is signaled).
- Apply the first matching group→role mapping; otherwise assign the fallback role.
Usage Tips
- If tokens still contain GUIDs, revisit Token configuration → Groups and change “Emit groups as” to a name format; reissue tokens by signing out/in. Names must be unique in your tenant for deterministic mapping.
- Overage: when the
_claim_names.groupsmarker is present and no groups are in the token, PhotoPrism cannot validate membership and will block login ifoidc-groupis set. (Graph-based resolution is described in the next section but is not yet implemented.) - For mixed environments, you can supply both names and GUIDs in
oidc-group/oidc-group-role; all entries are normalized and deduplicated.
Documentation & References
- Microsoft Entra ID: https://www.microsoft.com/en-us/security/business/identity-access/microsoft-entra-id
- Entra group claims: https://learn.microsoft.com/en-us/entra/identity-platform/access-token-claims-reference#groups-claim
- Entra app roles: https://learn.microsoft.com/en-us/entra/identity-platform/howto-add-app-roles-in-apps
- Group overage handling: https://learn.microsoft.com/en-us/entra/identity-platform/howto-add-app-roles-in-azure-ad-apps#group-overage-and-_claim_names
- Token customization guidance: https://learn.microsoft.com/en-us/entra/architecture/customize-tokens
Cluster Authentication & Access Control
When you run multiple instances behind a PhotoPrism® Portal, the Portal can act as the central identity provider for the whole cluster: users sign in once at the Portal, and the Portal then logs them in to the instances they are allowed to use. Each instance is an OpenID Connect client of the Portal, so the single sign-on flow described above is reused unchanged — only the issuer is the Portal instead of an external provider.
Enabling Portal Login on an Instance
Set PHOTOPRISM_CLUSTER_OIDC to "true" on an instance to use the Portal as its login provider. The instance then derives its OpenID Connect client ID and secret from the node credentials it received when it joined the cluster and defaults the Issuer URI to the Portal, so no manual PHOTOPRISM_OIDC_URI, PHOTOPRISM_OIDC_CLIENT, or PHOTOPRISM_OIDC_SECRET is required:
services:
  photoprism:
    ...
    environment:
      PHOTOPRISM_CLUSTER_DOMAIN: "example.com"
      PHOTOPRISM_PORTAL_URL: "https://portal.example.com/"
      PHOTOPRISM_CLUSTER_OIDC: "true"
      PHOTOPRISM_OIDC_REGISTER: "true"
Explicitly configured PHOTOPRISM_OIDC_URI, PHOTOPRISM_OIDC_CLIENT, and PHOTOPRISM_OIDC_SECRET values always take precedence over the automatic derivation, so you can still point an instance at a different provider if needed. PHOTOPRISM_OIDC_REGISTER must be "true" for users authorized by the Portal to create their account on the instance at first login.
After signing in at the Portal, users with access to a single instance are redirected straight to it, while users with access to more than one instance are shown an instance chooser and pick where to go.
Access Is Closed by Default
A user who can authenticate at the Portal is not automatically able to open any instance. Access to each instance must be granted explicitly, and it is re-evaluated on every login, so removing a user’s access takes effect the next time they sign in. There are two ways to grant access, and a user is admitted if either applies (when both apply, the highest-privilege role wins):
Per-user assignments. A cluster administrator assigns a user to an instance — with a specific role or the user’s default account role — in the Portal management interface, or from a terminal:
photoprism cluster users access grant --user [user-uid] --node [node-uuid] --role viewerSecurity groups. Membership in an Entra ID or other security group admits the user to the instances mapped to that group, with a role derived from the group. Each instance declares which groups it admits, either in its configuration or centrally in the Portal:
Environment CLI Flag Description PHOTOPRISM_CLUSTER_ALLOW_GROUPS –cluster-allow-groups admit one or more group IDs to this instance via the Portal (repeat to add more)PHOTOPRISM_CLUSTER_ALLOW_GROUP_ROLES –cluster-allow-group-roles map GROUP=ROLEfor admission to this instance (repeat to add more)PHOTOPRISM_CLUSTER_GROUPS_FULL_VIEW –cluster-groups-full-view also send the user’s full group set to this instance, not only the matched groups
Cluster Roles
The roles a user receives on an instance are the regular PhotoPrism® user roles (admin, manager, user, viewer, contributor, guest), assigned per instance through the grants and group mappings above.
The separate cluster_admin role applies only to the Portal: it grants access to the cluster management interface and the photoprism cluster commands. For security reasons, cluster_admin is never assigned through an external identity provider or security group, and it does not by itself grant access to any instance — a cluster administrator who also needs to use an instance must be assigned to it like any other user.
Support for running a Portal-managed cluster is only available with our team plans, not the personal editions.
Frequently Asked Questions
Can I configure a custom claim for the preferred username?
You can choose between preferred_username, name, nickname and verified2 email, where preferred_username is the default. The other claims are used as fallback if no value is returned for the configured claim.
Please note that it is currently not possible to use other standard or non-standard claims, as these may not be suitable for generating a username and no logic is implemented for doing so.
What if my provider does not return any claims for generating a username?
Certified OIDC Identity Providers, as well as public service providers such as Google, should support (at least) a subset of the standard claims that PhotoPrism can use to generate a username for newly registered accounts. These are preferred_username, name, nickname and verified2 email, where preferred_username is the default.
If only an unverified email address2 or none of these claims are returned, we recommend that you report this to the vendor of the Identity Provider you are using, as this is also likely to cause problems with other software. In a future release, we may offer additional config options to work around this issue, e.g. by generating a random username. However, this is currently not possible.
PhotoPrism® Documentation
For more information on specific features, services and related resources, please refer to the other documentation available in our Knowledge Base and User Guide:
PHOTOPRISM_OIDC_REGISTERmust be set to"true"to allow new users to create an account via OpenID Connect. ↩︎The
email_verifiedflag must be set by the OIDC Identity Provider so that theemailaddress can be used to send notifications and/or confirm the identity of users. If we do not insist on verification, this could otherwise have a negative impact on trust and security. ↩︎ ↩︎ ↩︎ ↩︎Admins are unable to change the authentication method of their own user account through the Admin Web UI, so they cannot accidentally lock themselves out e.g. by setting it to None. ↩︎
